The Cake Merchant

  • Home
  • About
  • recipes
  • Contact

Mint Chocolate Chip Marshmallows

12.24.16

Mint Chocolate Chip Marshmallows

Merry Christmas Eve! I should be wrapping last minute gifts, packing for my trip to Indiana, and preparing for my concert tonight (because Christmas Eve is a working day for a musician), but instead I’m posting one last recipe because I just had to share these with you. If you would have asked me a few years ago or even a few weeks ago if homemade marshmallows were worth the effort, I would have said, “meh” or some other grunt-like syllable. But I was so wrong, because after making my first batch I just couldn’t stop. They are so darn fluffaaay!

Mint Chocolate Chip Marshmallows

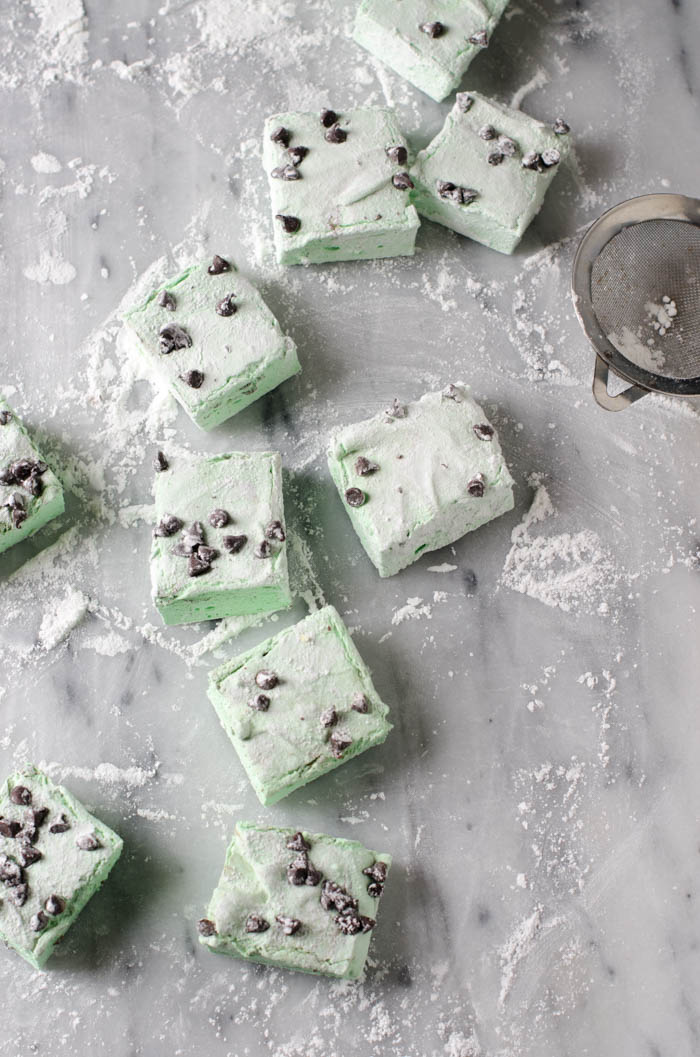
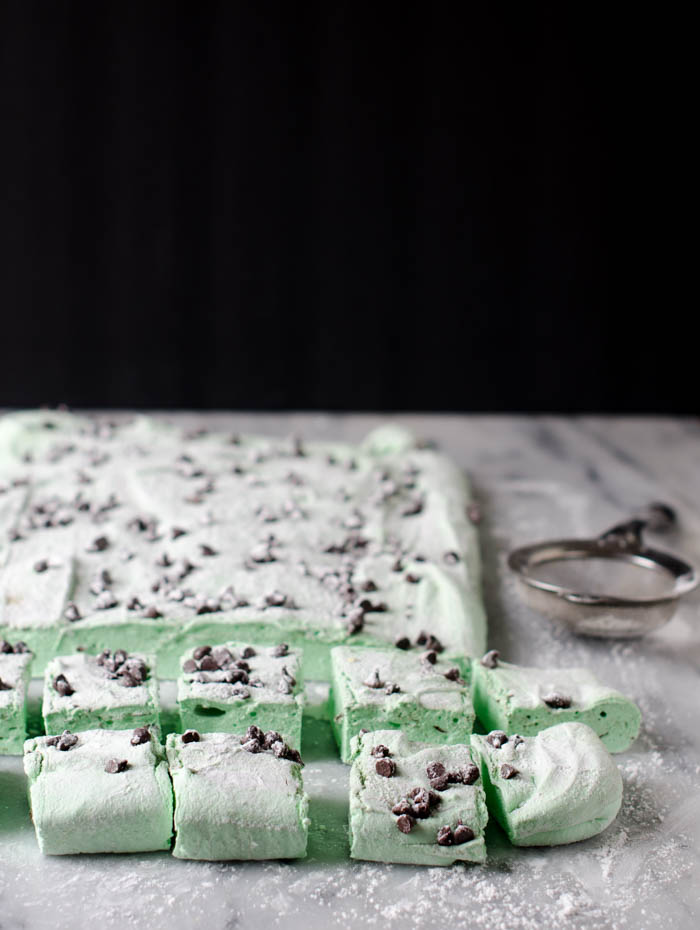
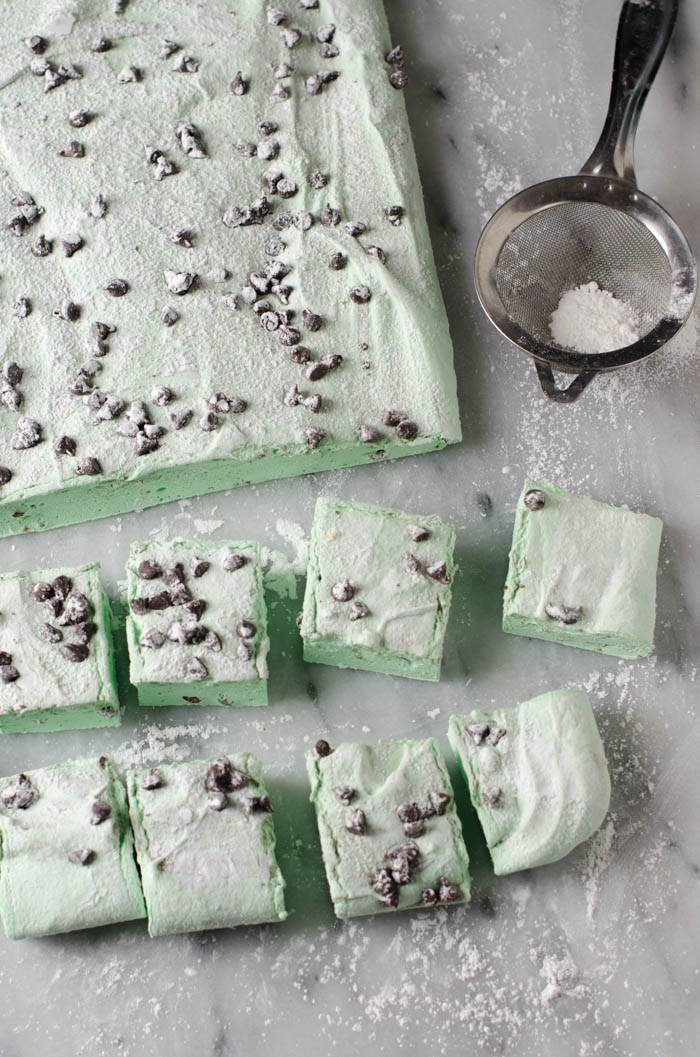
Even though I’m no expert at candy making and boiling sugar syrup usually scares me, marshmallows are surprisingly easy and fun to make. I tried a couple of different recipes, and after I found my one I liked, I used it as a base to go crazy with flavor combinations- vanilla, coffee, gingerbread, and my favorite- mint chocolate chip!

Mint Chocolate Chip Marshmallows

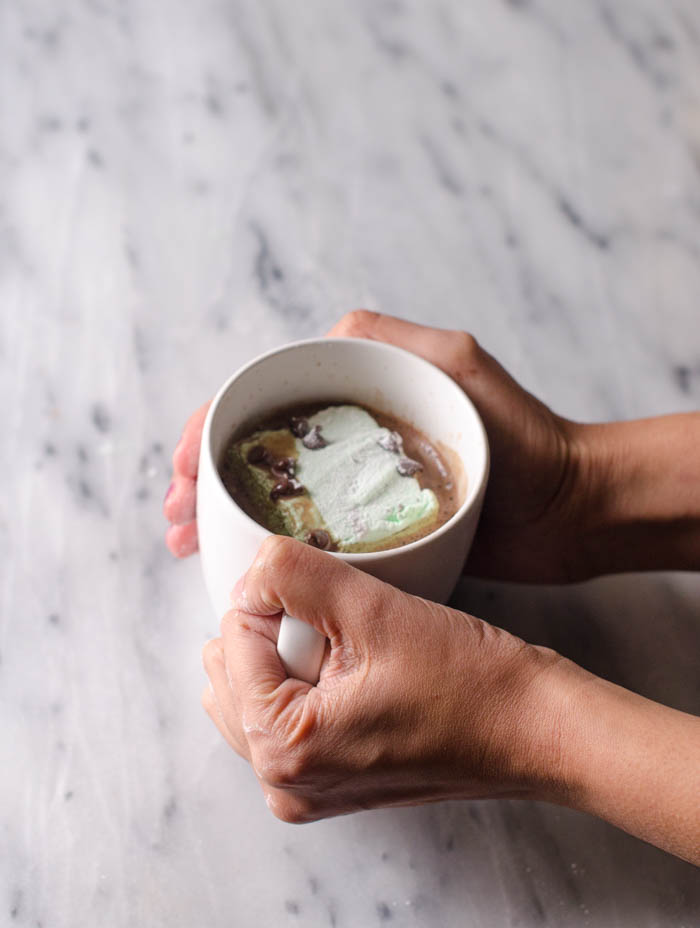
I packaged them up and shipped them to my friends with my favorite hot cocoa mix recipe, but yesterday I made a big batch for the blog and also for myself since I wanted to have marshmallows on hand for all the hot chocolate drinking I plan to do after Christmas. It hasn’t been all that cold here in Dallas, so I’m going to bring them to Indiana with me where I will drink mugs of hot chocolate while sitting by the fire and watching the snow.

Mint Chocolate Chip Marshmallows

Even though marshmallows are fairly simple to make, you will need a candy thermometer to do it. I use this one, since it’s cheap and it works well. A stand mixer is also really helpful. It’s possible to make them without one, but you’ll probably need another person to help you since the mixing process takes a while.

Mint Chocolate Chip Marshmallows

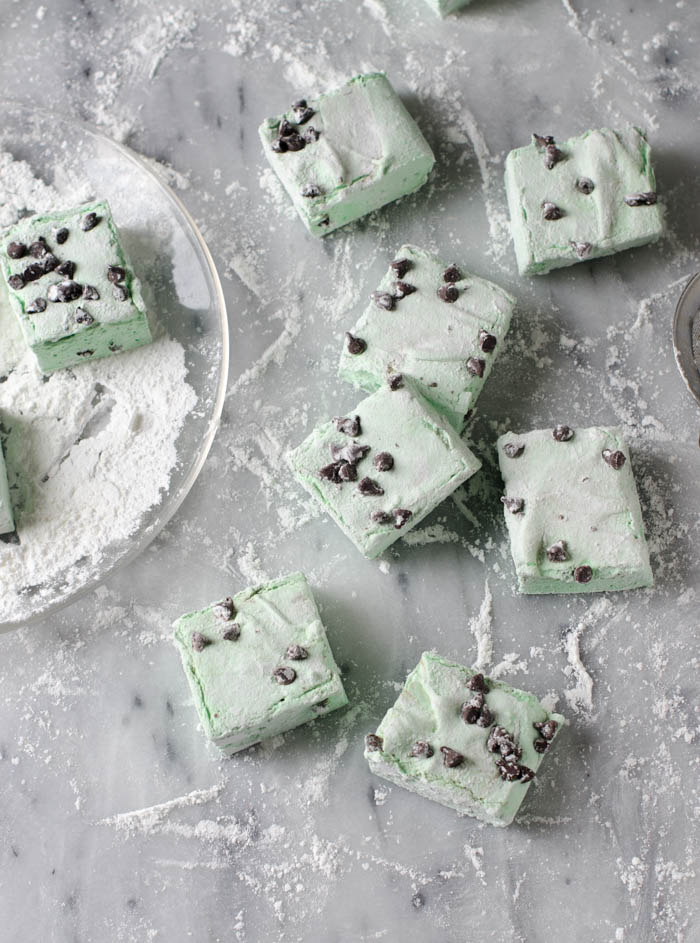
My first batch of these tasted great, but the chocolate chips melted when I put them into the marshmallow mixture so I ended up with a swirl effect. It wasn’t bad, but not what I had in mind. The secret to getting the chocolate chips to stay in tact is to freeze them first, and then add them in the last few seconds of mixing.

Mint Chocolate Chip Marshmallows

Here are a few other helpful hints for marshmallow making.
-Measure out all of your ingredients before you start since you’ll have to work quickly in certain stages.
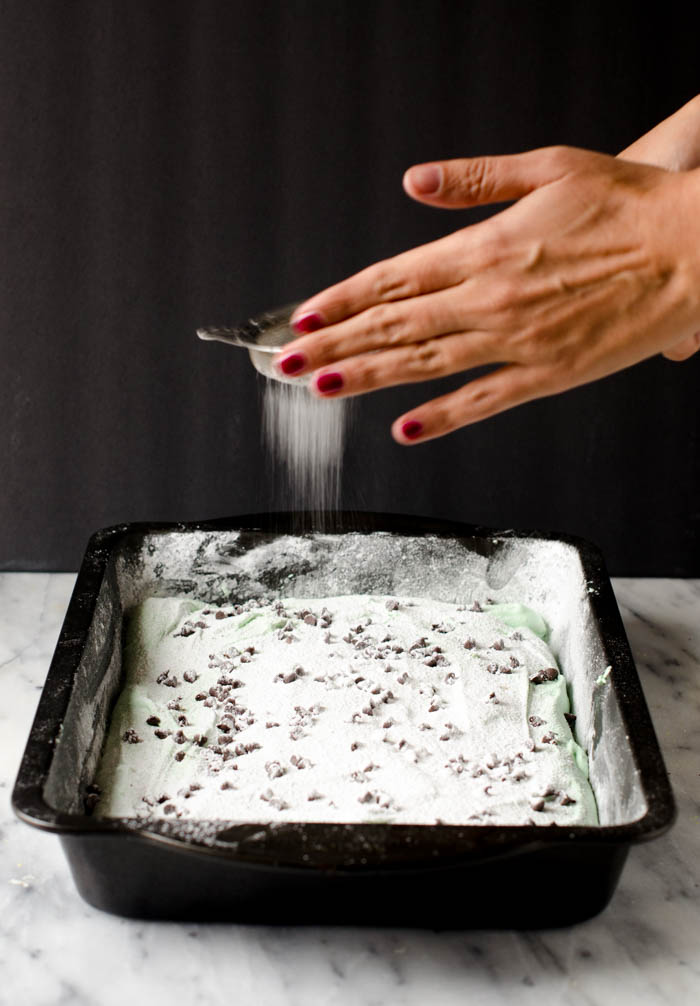
-Grease your pan well and dust it with powdered sugar, but don’t bother to line it. I’ve found that foil or parchment gets in the way when you are trying to spread the marshmallow mixture.
-Don’t try to get every last bit out of the bowl. If you do, your marshmallow mixture will start to set and you won’t be able to spread it.
-Have two greased spatulas on hand- one of getting the marshmallow mixture out of the bowl and another one for spreading the mixture out in the pan. Once the marshmallow mixture starts to stick to the spatula, it’s hard to use that same spatula for spreading (you’ll see what I mean when you make them).

Happy Marshmallowing!

Read The Post

3 Comments · Candy, Holiday

No Bake Tiger Butter Tart

10.08.14

Tiger Butter Tart

Have you heard of tiger butter? It’s basically just white chocolate, peanut butter, and dark chocolate all swirled together to look like tiger stripes. I was first introduced to tiger butter on my 7th birthday, so it’s kind of a nostalgic flavor for me. I had a candy making party at the shop where my mom took cake decorating classes, and even though we made lots of different candies that day, I can’t remember any other than the tiger butter. Maybe there’s something about the chocolate peanut butter combo that just sticks with you. Or perhaps it’s because I was in a sugar coma from all of the candy I ate, so I don’t remember much else. I do remember my friends and I eating the hell out of some tiger butter, though. My poor mother…

I didn’t think about tiger butter for a long time after that, but when I moved to LA, they had tiger butter caramel apples at a candy shop near Hollywood and Highland. Every time a friend or family member would come to town, we’d do the usual touristy stuff and as a reward for seeing the walk of fame for a gazillionth time, I would treat myself to a tiger butter apple.

Since it’s almost Halloween, I had planned to make tiger butter caramel apples in the spirit of the holiday. I soon realized that these apples required more coordination than I had, so I ended up making this tiger butter tart instead, and I think it tastes even better than the apple version. I suppose it’s no longer a Halloween themed treat, but it does taste like candy. Plus, it’s way easier to make. The swirl pattern is simpler than it looks.

You’ll start by pouring in your peanut butter ganache filling into the prepared tart shell. Then take your chocolate ganache and put it into a piping bag or a plastic bag (make sure it’s slightly cooled so you don’t melt the bag) and creating a zig zag pattern over the peanut butter mixture. As you can see, it doesn’t have to be precise. Next, take a wooden skewer and stick it about halfway down into the filling (don’t let it touch the crust) and make a figure 8 pattern all throughout mixture. Again, doesn’t need to be precise. It will still come out looking pretty.

Tiger Butter Tart

The first time I made this, I used whole Oreo cookies for the crust, but combination of whole Oreos with a sweet tart filling was tooth achingly sweet. I ended up using a mixture of Newman’s Own alphabet cookies and chocolate graham crackers just because it’s what I had on hand. You could also use the outsides of Oreo cookies minus the cream or those elusive chocolate wafer cookies (which I finally found but were quite expensive). I ended up using a stick of melted butter in the crust, but you may need more or less depending on what kind of cookie you use. Just make sure the texture is not too crumbly or you won’t be able to mold it into the tart pan. A chocolate shortbread crust would work nicely too. Maybe I’ll try that next time when I’m not too lazy to roll out dough.

I hate to dirty extra dishes so the first time I made the filling, I dumped the white chocolate into the pot of hot cream and whisked the heck out of it to make it smooth keep it from sticking to the bottom of the pot. However, you’ll end up with grainy ganache if you do this. Put the white chocolate in a separate bowl, pour the cream over it, and let it melt slowly. It’s worth the extra dirty dish.

Tiger Butter Tart
Tiger Butter Tart

Print
No Bake Tiger Butter Tart

Yield: One 14x5 Tart

Ingredients

    For the Crust:
  • 10 ounces chocolate wafer cookies
  • 8 tablespoons (113 grams) unsalted butter, melted
  • For the Chocolate Ganache:
  • 1/3 cup semisweet or bittersweet chocolate (or chocolate chips)
  • 3 tablespoons heavy cream
  • Plastic bag
  • Wooden skewer
  • For the Peanut Butter Filling:
  • 8 ounces (227 grams) good quality white chocolate, chopped (not candy melts)
  • 1/2 cup (120 ml) heavy cream
  • 1/2 cup peanut butter

Instructions

    For the Crust:
  1. Put the chocolate wafer cookies in a food processor and process until they are finely ground.
  2. Add the melted butter and mix until the cookie crumbs are well coated.
  3. Press the crust into a 14x5 inch tart pan (I used this one) and refrigerate while you make the filling.
  4. For the Chocolate Ganache:
  5. Place the chopped chocolate in a heatproof bowl.
  6. Heat the heavy cream in a small saucepan until just boiling.
  7. Pour the heavy cream over the chocolate and let sit for about 5 minutes.
  8. Whisk gently until smooth and set aside to cool slightly.
  9. For the Peanut Butter Filling:
  10. Place the chopped white chocolate in a heat proof bowl.
  11. In a small saucepan, heat the heavy cream until it's just about to boil.
  12. Pour the heavy cream over the white chocolate and let it sit for about 5 minutes.
  13. Whisk the ganache gently until smooth.
  14. Add the peanut butter a few tablespoons at a time and whack gently after each addition until the mixture is smooth.
  15. Pour the peanut butter mixture into the prepared tart crust.
  16. To Make the Swirl
  17. Once the chocolate has cooled slightly, put it into a piping bag or a ziploc bag.
  18. Snip the corner off the end of the bag and pipe onto the peanut butter filling in a zig zag pattern.
  19. Put a wooden skewer halfway dow into the mixture being careful not to touch the bottom and swirl it around in a figure 8 motion.
  20. Refrigerate the tart for about an hour, or until set.
3.1
https://cakemerchant.com/2014/10/08/tiger-butter-tart/

17 Comments · Candy, Pie

Easy Chocolate Peanut Butter Fudge

12.21.13

Peanut-butter-fudge

I’ve got more fudge comin’ atcha today! Why? Because it’s delicious. And easy. I wish I could find a more articulate way to describe it, but I feel like I’ve used up all my words for 2013. Seriously, my brain is fried, and I’ve been stress eating chocolate peanut butter fudge for the last several days. Sorry to all of those friends whose Christmas gift boxes ended up being a little smaller!

Read The Post

8 Comments · Candy, Holiday

  • 1
  • 2
  • 3
  • Older Posts

About Me

Welcome to the Cake Merchant! I’m Natasha, the cake maker behind this blog. Here, I share my favorite cakes, baking tips, dessert experiments, and the occasional picture of my dog... READ MORE

Keep In Touch

  • Email
  • Instagram
  • Pinterest
  • RSS

Subscribe

Small Batch Favorites

  • Vegan Blueberry Almond Crumb Muffins for Two
    Vegan Blueberry Almond Crumb Muffins for Two
  • Teeny Tiny Chocolate Cake for One
  • Double Chocolate Chip Skillet Cookie for Two
  • Mini One Bowl Yellow Cake with Malted Chocolate Frosting
  • Birthday Cakes in a Jar
  • Small Batch Chocolate Chip Cookies

© Copyright 2025. The Cake Merchant. All Rights Reserved. Design by Oh Wild.

Cleantalk Pixel