The Cake Merchant

  • Home
  • About
  • recipes
  • Contact

Portable Chocolate Olive Oil Cakes and a Road Trip West

06.13.14

Chocolate Olive Oil Cake

I’m bringing you more jar food today! This time, the jars actually serve a purpose- PORTABLE CAKE! Ok, I’ll stop yelling now, but you get the picture. Cakes in jars excite me.

My friend Jon moved to Oregon last week, and even though I still haven’t quite forgiven him for leaving, I thought I would be a supportive friend and do the drive from Dallas to Eugene with him. I’m fairly certain that any good road trip needs to include portable cakes, just in case of emergencies. You may think this is a little extreme, but we did actually have an emergency, which I’ll get to in a bit.

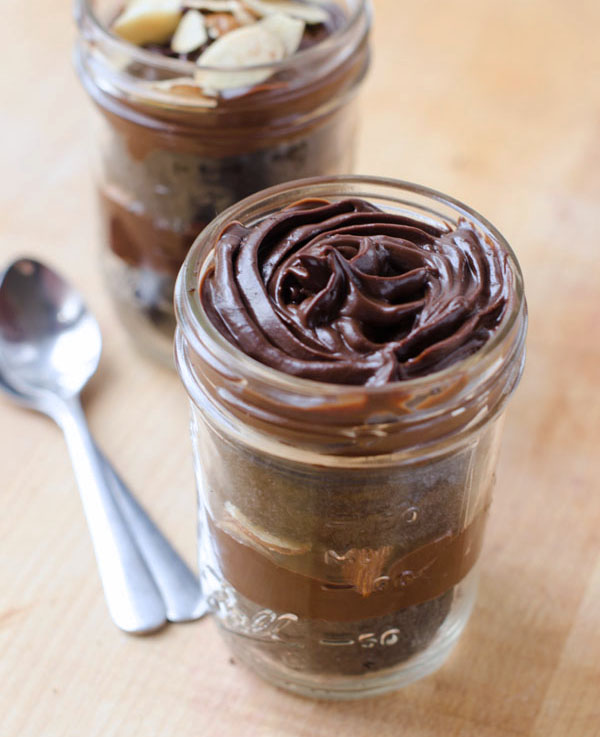
Ever since I made these cookies a few weeks ago, I’ve been fixated on combining chocolate and olive oil in cake form. The flavors really go well together, and this time I added a little almond to the mix as well. This recipe is another super simple one- a one bowl cake with no mixer required, not even for the frosting! It’s a small batch recipe that makes only 2 cakes, which are baked directly in the mason jars that you will later be spooning them out of. This recipe is also egg and dairy free.

Chocolate Olive Oil Cake

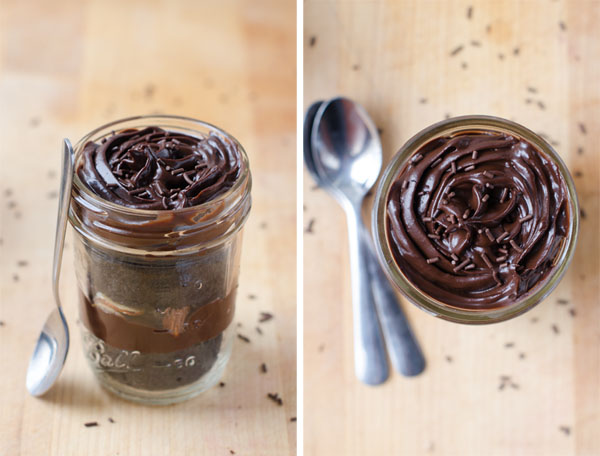
The frosting is a chocolate ganache made with coconut milk, cooled to room temperature, and then piped onto the cakes. If you’re not a fan of coconut, don’t worry. I couldn’t taste it at all, especially after adding a little bit of amaretto liquor to the ganache. I topped my cakes with chocolate sprinkles and some honey roasted almonds that I got at Trader Joe’s, but if you’re vegan, maple roasted almonds would be a good substitute.

Now on to the road trip. We drove though Texas, Oklahoma, Kansas, Colorado, Utah, Idaho, and Oregon.

Oklahoma always surprises me with their restaurants. We found a place in Norman called Local with lots of veggie options and a great green chili chowder.

I continued my love/hate relationship with Colorado. It was beautiful, as always, but I swear I’m allergic to everything that blooms there, and the altitude drives me bonkers. Also, just as we were crossing into the Colorado border, we got caught in a terrible hail storm and Jon’s windshield got smashed. After getting pummeled for about 15 minutes, we managed to take cover at a gas station and ate cake out of a jar while waiting out the storm. I told you it came in handy!

Oregon

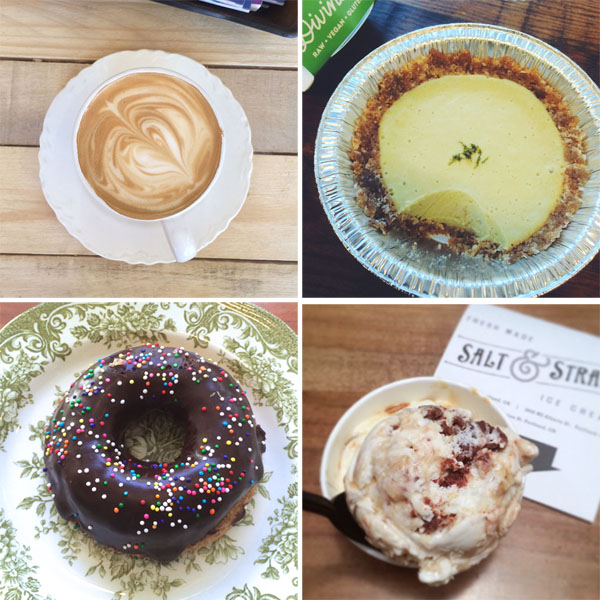
We waited at a lovely little coffee shop while getting the windshield fixed in Idaho, but it set us back several hours in our trip, so the time that we had planned to stop in Portland got cut short. We did, however, get to stop at Salt and Straw (best ice cream ever!) which was recommended to me by Erika (check out her blog post all about Portland). There was a line out the door, which made me feel as though I was among kindred spirits. Anyone willing to wait in line for 30 minutes for ice cream understands me.

I also got to have Divine Pie! I saw these raw vegan pies on the Cooking Channel last year, and I’ve been dying to try them ever since. They sell them at the Portland Farmer’s Market on Saturdays, and even though we were there on Friday, I was able to locate one at a Whole Foods. They lived up to every expectation, and now I’m obsessed with raw vegan pie. You can see my experiments on Instagram.

Oregon

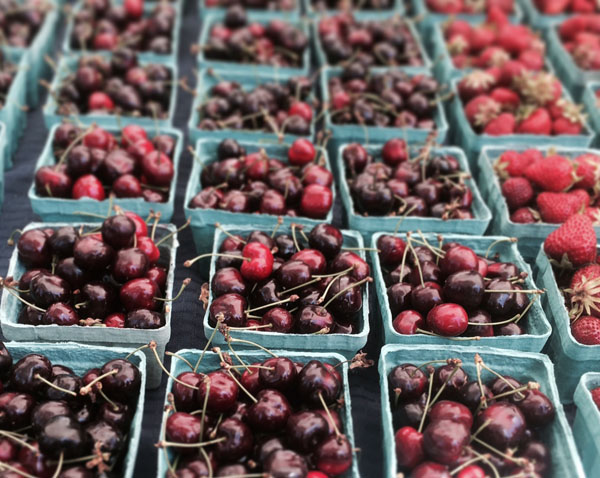
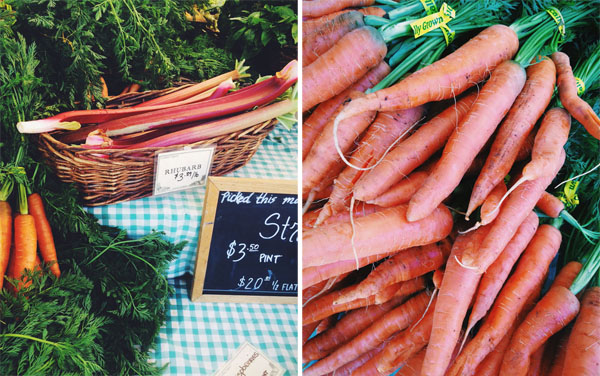
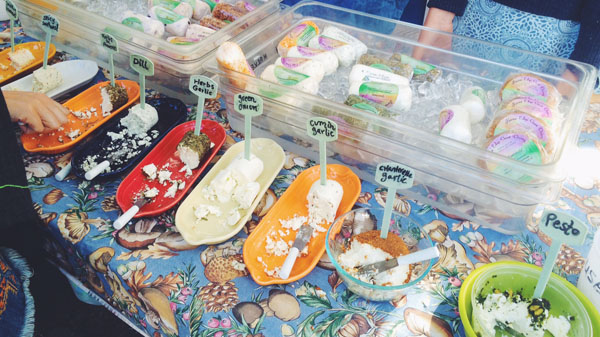
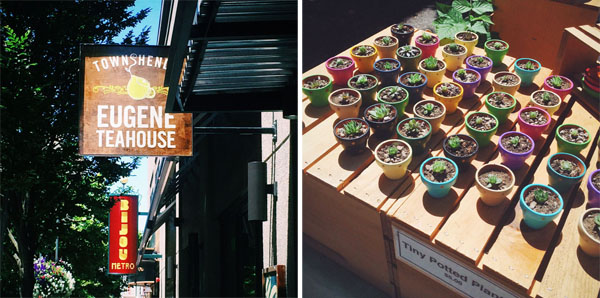
Even though we missed the Portland market, we did get to see a little bit of the Saturday Market in Eugene. Highlights included cherries for miles, rhubarb (which I have yet to find in Dallas), every flavor of goat cheese imaginable, teeny tiny potted plants, and more dreadlocks than I have ever seen in my life. I feel like Oregon is my food soul mate and I can’t wait to go back!

Oregon

Oregon-16

Processed with VSCOcam with f2 preset

Oregon-17

Oregon


Print
Portable Chocolate Olive Oil Cakes

Yield: 2 mason jar cakes or 3 cupcakes

Ingredients

    For the Cake:
  • 4 tablespoons non-dairy milk
  • 1/4 teaspoon vinegar
  • 1/2 teaspoon vanilla extract
  • 3 tablespoons granulated sugar
  • 3 tablespoons olive oil
  • 1/4 cup all purpose flour
  • 2 tablespoons cocoa powder (I used Dutch process)
  • 1/4 teaspoon baking soda
  • 1/8 teaspoon baking powder
  • pinch of salt
  • For the Ganache:
  • 1/3 cup full fat canned coconut milk
  • 6 ounces semi-sweet chocolate
  • 1 tablespoon amaretto liquor (optional)
  • Toppings:
  • Chocolate sprinkles
  • Honey roasted almonds

Instructions

    For the Cake:
  1. Preheat the oven to 350 degrees fahrenheit.
  2. Grease and flour 2 half-pint sized mason jars (I used Bake Easy non-stick spray) and place them on a baking sheet for easier handling.
  3. In a small bowl, combine the non-dairy milk and vinegar. Set aside for a couple of minutes to curdle.
  4. Add the vanilla extract, sugar and olive oil and whisk until frothy.
  5. Add the all purpose flour, cocoa powder, baking soda, baking powder, and salt.
  6. Whisk until combined.
  7. Divide the batter between the mason jars and bake for 20-23 minutes, until a toothpick inserted into center of the cake comes out clean.
  8. Cool on wire racks for about 15 minutes.
  9. Run a knife around the sides of the cakes and turn them out of the mason jars to cool completely.
  10. For the Ganache:
  11. In a small sauce pan, heat the coconut milk over medium heat until it just beings to boil.
  12. Remove the pan from the heat and whisk in the chocolate and liquor until the mixture is smooth.
  13. Let the mixture come to room temperature.
  14. To Assemble the Cakes:
  15. Place the frosting in a piping bag fitted with a star tip
  16. If your cake has domed up on the top, slice it off to make the cake flat (the dome is perfect for taste testing).
  17. Slice the cake horizontally into 2 even layers.
  18. Place one layer of the cake in the bottom of the jar.
  19. Pipe a layer of frosting over the cake.
  20. Add an additional layer of cake and pipe an additional layer of frosting.
  21. Top with sprinkles and/or honey roasted almonds.
3.1
https://cakemerchant.com/2014/06/13/portable-chocolate-olive-oil-cakes-road-trip-west/

32 Comments · Cake, Vegan

Chocolate Chip Birthday Cake

05.25.14

Chocolate Chip Cake

My second blogiversary was last week, and I am quite belated in posting this blog birthday cake, mostly due to my total inability to make a decision. This is precisely why I always make 2 cakes for my birthday, since choosing one is way too much pressure. Add to that the pressure of being a food blogger and I pretty much had a meltdown. Sometimes I feel like I have be super inventive and make something with exotic flavors because that’s totally the trend right now, but the truth is, I don’t like exotic flavors in my cake. I think it has to do with the fact that I was force fed saffron and cardamom laced desserts from an early age, and my grandmother insisted on putting rose flavored syrup in my milk, so the little kid in me is still rebelling. Plus, I really like chocolate.

Chocolate Chip CakeChocolate Chip CakeChocolate Chip CakeChocolate Chip Cake

That being said, this cake kind of came about by accident. If you follow me on instagram, you know that I had a major cake fail last week, and that in the process of failing, I ran out of butter and didn’t have enough frosting to fill my chocolate cake. Being the lazy baker that I am, I didn’t want to go to the the grocery store to buy more butter, so I ended up using whipped cream as the filling. I threw in a few mini chocolate chips for texture, paired it with my favorite one bowl chocolate cake recipe, and frosted the outside with a quick and easy chocolate buttercream. A total make it work cake that has turned into my current favorite. I know, I say that about every cake, but I’ve made this twice in one week!

Because of the whipped cream filling, this cake should be kept refrigerated (when not being eaten of course). Fear not, though, because this particular chocolate cake holds up really well against refrigeration. Seriously, I’m convinced in has magical powers that will keep it from drying out, and will stay moist for 4-5 days in the refrigerator if kept covered. To keep the whipped cream from deflating in the refrigerator, I mixed in some agar agar powder, which helps it keep it’s texture. If you don’t have agar agar, you can also use the gelatin method, which is described here.

For the chocolate cake recipe, click here.

Print
Chocolate Chip Birthday Cake

Yield: One 3 layer 8-inch cake

Ingredients

    For the Chocolate Chip Whipped Cream:
  • 2 cups (480 ml) heavy whipping cream, chilled
  • 2 tablespoons granulated sugar
  • 1 tablespoon pure vanilla extract
  • 2 teaspoons agar agar powder (not flakes)
  • 3/4 cup (130 grams) mini chocolate chips
  • For the Chocolate Frosting:
  • 3 sticks (12 ounces/339 grams) unsalted butter, softened but still cool
  • 2 1/2 cups (290 grams) confectioner's sugar
  • 1 1/4 cups (220 grams) good quality milk chocolate chips (I used Guittard)
  • 1/4 cup (45 grams) bittersweet chocolate chips
  • 2 teaspoons pure vanilla extract
  • pinch of salt
  • additional mini chocolate chips for topping

Instructions

    For the Chocolate Chip Whipped Cream:
  1. With an electric mixer, beat the whipped cream on medium high until stiff peaks are about to form.
  2. Add the sugar, vanilla extract, and agar agar and beat until stiff peaks have formed.
  3. Gently fold in the chocolate chips.
  4. Keep refrigerated until ready to use.
  5. For the Chocolate Frosting:
  6. With an electric mixer, beat the butter on medium high until light and creamy.
  7. Add the confectioner's sugar and mix on low until combined.
  8. Beat in medium high for an additional 2-4 minutes.
  9. Add in the melted milk and bittersweet chocolate, vanilla extract, and salt, and beat until combined.
  10. Scrape down the sides of the bowl and beat on low until no more streaks of butter remain.
  11. To Assemble the Cake:
  12. Place one layer of the cake on an 8-inch cake board.
  13. With an offset spatula, spread half of the whipped cream filling on top of the first layer.
  14. Repeat this process with the second layer, spreading the remainder of the filling on top.
  15. Place the 3rd layer on top.
  16. Place the cake on a turntable, and apply a thin layer of the chocolate frosting on the sides and the top of the cake to lock in the crumbs.
  17. Let the frosting set up in the refrigerator for about 30 minutes.
  18. Apply the remainder of the frosting to the sides and top of the cake and garnish with mini chocolate chips.
3.1
https://cakemerchant.com/2014/05/25/chocolate-chip-cake/

Chocolate Cake Recipe adapted from Sky High: Irresistible Triple-Layer Cakes
Whipped Cream recipe adapted from allrecipes.com

Note: The Chocolate Frosting makes enough to crumb coat and frost the cake as well as pipe decorations like you see here.

41 Comments · Cake

Chocolate Cherry Amaretto Cake

05.14.14

Chocolate Cherry Amaretto Cake

Have you ever had cake paralysis before? Cake paralysis is when you are so stuck on making one kind of cake, that you can’t bake anything else until you make the one cake that has been taking over all the cake space in your brain. It’s a real thing, even though I kind of made it up. Sort of like frosting OCD. You’ll be seeing commercials about it on TV shortly (ask your doctor about cake paralysis)…

Read The Post

28 Comments · Cake

  • Newer Posts
  • 1
  • …
  • 8
  • 9
  • 10
  • 11
  • 12
  • …
  • 18
  • Older Posts

About Me

Welcome to the Cake Merchant! I’m Natasha, the cake maker behind this blog. Here, I share my favorite cakes, baking tips, dessert experiments, and the occasional picture of my dog... READ MORE

Keep In Touch

  • Email
  • Instagram
  • Pinterest
  • RSS

Subscribe

Small Batch Favorites

  • Vegan Blueberry Almond Crumb Muffins for Two
    Vegan Blueberry Almond Crumb Muffins for Two
  • Teeny Tiny Chocolate Cake for One
  • Double Chocolate Chip Skillet Cookie for Two
  • Mini One Bowl Yellow Cake with Malted Chocolate Frosting
  • Birthday Cakes in a Jar
  • Small Batch Chocolate Chip Cookies

© Copyright 2025. The Cake Merchant. All Rights Reserved. Design by Oh Wild.

Cleantalk Pixel