The Cake Merchant

  • Home
  • About
  • recipes
  • Contact

Vegan Chocolate Raspberry Crunch Cheesecake Bites

11.01.14

Chocolate Raspberry Cheesecake Bites

Our last few Halloweens have gone something like this:

1. Dress Bigsby up as a hot dog.
2. Buy lots of Halloween Candy.
3. Have one trick-or-treater come by the entire night and proceed to make ourselves sick on leftover candy.

This year, we decided that due to our lack of trick-or-treaters (and self-control), we did not want to repeat this tradition. Rather than sit at home and wait to hand out candy to nobody, Aaron and I got our butts out the door and played some Halloween night tennis. When our sweet craving hit, we ate kinda healthy cheesecake. Ok, not exactly healthy, but way better for you than anything you can get in a plastic bag at the store.

I know I’m the last one to talk about healthy eating with a blog full of sugary cakes, but I’ve recently discovered how good raw vegan desserts can be, and I wanted to share one of my new favorite creations with you. I was first introduced to raw desserts a few years ago at an all raw Oklahoma restaurant called Matthew Kenney, and my obsession with raw vegan desserts grew after having Divine Pie in Portland, Oregon. I tried to exactly recreate the raw vegan key lime pie I had there (you can read about that here) but I got tired of almost losing my fingers attempting to hack open young coconuts. Oboists need their fingers.

Chocolate Raspberry Cheesecake Bites

This newer version involves a filling made of cashews. I’ve made cashew cheesecake before, but found it to be not as creamy as non-vegan cheesecake, so I used Divine Pie’s method of adding a little bit of soy lecithin. It’s an emulsifier that adds creaminess to the texture, and was surprisingly easy to find at my local grocery store. I’m not 100 percent sure that lecithin is raw, though, so I’m not labeling this dessert as such.

The crust is a little but different than what I’ve used before as well. I upped the quantity of the dates so it has a chewier, more brownie like texture. In the past, I’ve used medjool dates, but deglet dates were half the price at the grocery store and I couldn’t tell the difference in the finished product. I could totally have eaten the crust plain and just called them brownies.

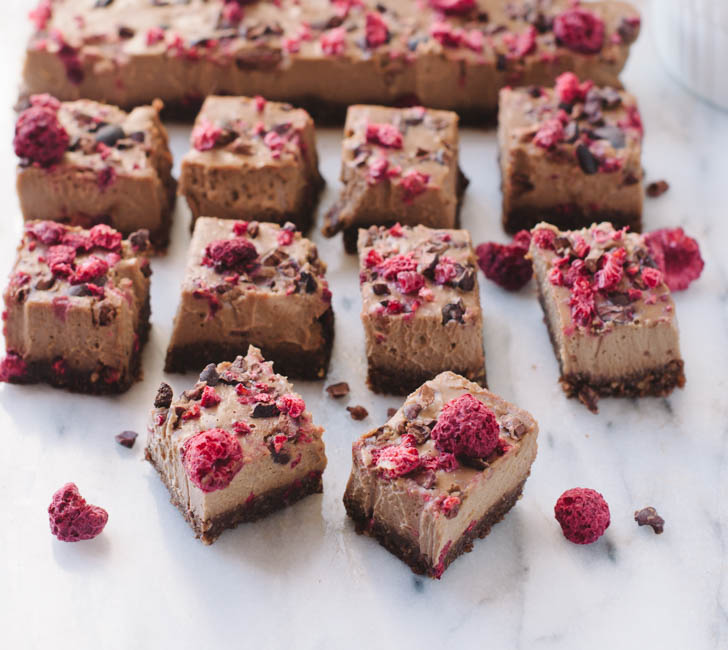
You can top the cheesecake bites with whatever you like- nuts, fresh or freeze dried fruit, coconut, etc., but I wouldn’t skip the cacao nibs. They’re my newest obsession. I got sucked in when I picked up a few from the bulk section the last time I was at Central Market, and now they take a hefty chunk out of my grocery budget on a regular basis.

Chocolate Raspberry Cheesecake Bites


Print
Vegan Chocolate Raspberry Crunch Cheesecake Bites

Ingredients

    For the Crust:
  • 1 cup deglet or medjool dates
  • 1 cup pecans
  • 4 tablespoons raw cacao powder
  • 1/2 cup shredded unsweetened coconuts
  • 1 teaspoon pure vanilla extract
  • 1/4 teaspoon salt
  • For the Filling:
  • 1 1/4 cup cashews, soaked for at least 4 hours or at least overnight
  • 1 cup non-dairy milk (I used hazelnut milk)
  • 4 tablespoons raw cacao powder
  • 1/2 cup raw agave (or maple syrup if you're not concerned about raw)
  • 1 teaspoon pure vanilla extract
  • 1/8 teaspoon salt
  • 1/2 cup coconut oil (refined if you don't want coconut flavor)
  • 1 1/2 teaspoons non-GMO soy lecithin
  • about 1/4-1/3 cup freeze dried raspberries and/or cacao nibs for topping

Instructions

    For the Crust:
  1. In a food processor, combine all of the ingredients and process until they come together into a ball. The mixture should be pliable.
  2. Press the mixture into an 8x8 pan lined with parchment or waxed paper. Set aside.
  3. For the Filling:
  4. In a high powdered blender, combine the cashews, non-dairy milk, cacao, agave, vanilla extract, and salt and blend for about 5 minutes (or longer depending on your blender) until completely smooth.
  5. Add the coconut oil and soy lecithin and blend for an additional 15 seconds until smooth (don't over blend here or the coconut oil will start to solidify).
  6. Pour the mixture over the crust and tap the pan against the counter a few times to knock out any air bubbles.
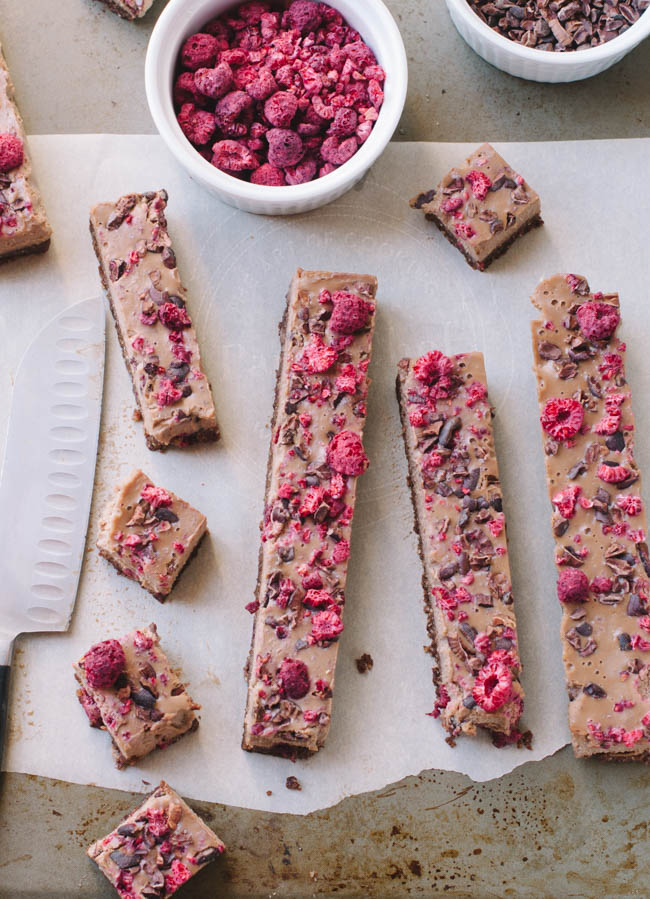
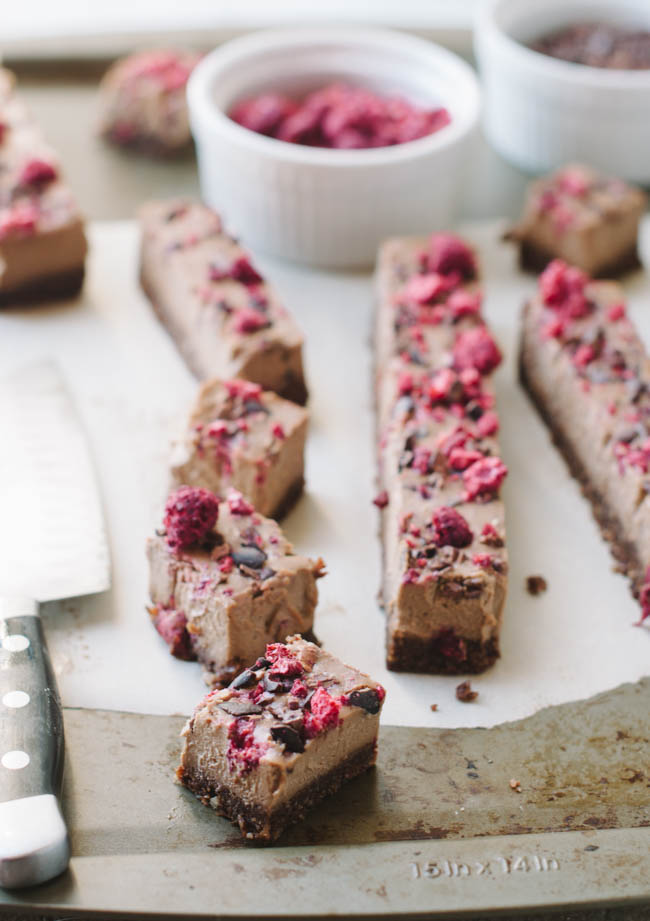
  7. Top the filling with freeze dried raspberries and and cacao nibs and let it set in the refrigerator for at least 4 hours, preferably overnight.
  8. Cut into pieces and serve cold. Keep refrigerated.
3.1
https://cakemerchant.com/2014/11/01/vegan-chocolate-raspberry-crunch-cheesecake-bites/

Notes:
-Recipe inspired by Divine Pie
-If you’re not concerned about this being raw, you can substitute cocoa powder for cacao.
-Refined coconut oil will not impart any coconut flavor. Unrefined coconut oil will, so choose what you like best. Both will work.

17 Comments · Brownies and Bars, Vegan

Cinnamon Caramel Pecan Cake

10.16.14

Butter Pecan Cake

It’s October, which means two things.

1. The entire series of Gilmore Girls is now on Netflix, so I will never again be a productive human being.
2. The house must always smell like cinnamon and toasty pecans.

The mall where I grew up used to have stands of cinnamon candied pecans around the holidays, so it just doesn’t feel like fall without that heavenly smell. I suppose a scented candle would suffice, but baking has a better end result, so here’s yet another excuse to bake a cake. I don’t think Aaron has ever repeated, “Something smells good,” as much as when I was making all the components to this cake. It really is everything that’s good about fall wrapped up in one lovely little layer cake package- layers of buttery cake with toasted pecans, a brown sugar and cinnamon frosting, and a caramel sauce that’s spiked with some rum. What could be bad about that?

Butter Pecan Cake
Butter Pecan Cake
Butter Pecan Cake

When I was getting ready to make the caramel sauce for this cake, I realized I was out of cream, so I decided to try this version which uses brown sugar and evaporated milk. Unlike the traditional method, this one is practically foolproof. There’s very minimal chance of burning the sauce or yourself (both of which I have done), and while the flavor is not quite as complex as the recipe I usually use, it still beats the crap out of the store bought variety. I added a healthy dose of vanilla, a big pinch of salt, and stirred in a couple of tablespoons of rum at the end to give it some more depth. If it’s your first time making caramel, this recipe is a good option.

Oh, and before I go, let’s talk about this brown sugar and cinnamon swiss buttercream for a sec. Make it, frost your cake with it, and don’t worry if you have leftovers. Spread it on cinnamon rolls, toast, spoon it into your mouth while watching Gilmore Girls, bathe in it, whatever. I always err on the side of extra frosting since I like a smooth finish to my cakes, and I assure you that the leftovers never made it to the freezer.

For the caramel sauce recipe, click here. I added 2 tablespoons of rum along with the vanilla extract.

Print
Cinnamon Caramel Pecan Cake

Yield: One 4 layer 8-inch cake

Ingredients

    For the Butter Pecan Cake:
  • 3 tablespoons (42 grams) unsalted butter, melted
  • 1 1/3 cups (140 grams) chopped pecans
  • 2/3 cup (150 grams) butter, softened but still cool
  • 1 1/3 cups (270 grams) granulated sugar
  • 2 eggs, at room temperature
  • 2 teaspoons pure vanilla extract
  • 2 cups (250 grams) all-purpose flour
  • 1 1/2 teaspoons baking powder
  • 2 teaspoons ground cinnamon
  • 1/4 teaspoon salt
  • 2/3 cup (160 ml) whole milk, at room temperature
  • For the Brown Sugar and Cinnamon Swiss Meringue Buttercream:
  • 10 ounces (280 grams or about 10 large) egg whites (I used liquid egg whites)
  • 1 1/2 cups (330 grams) light brown sugar, packed
  • pinch of salt
  • 6 US sticks (3 cups or 680 grams) unsalted butter, softened but still cool and cut into 2-inch chunks
  • 1 tablespoon cinnamon
  • 2 teaspoons pure vanilla extract

Instructions

    For the Butter Pecan Cake:
  1. Preheat the oven to 350 degrees fahrenheit.
  2. Place the melted butter and pecans in a baking pan, stir to coat the pecans, and bake 10 minutes. Set aside to cool.
  3. Grease and line 2 8-inch baking pans with parchment paper.
  4. With an electric mixer, beat the butter and sugar together on medium high for about 5 minutes, until light and fluffy.
  5. Scrape down the sides of the bowl with a spatula.
  6. Turn the mixer town to medium and beat the eggs in one at a time until incorporated.
  7. Add the vanilla and beat to combine.
  8. In a medium bowl, whisk together the flour, baking powder, cinnamon, and salt.
  9. With the mixer on low, add the flour mixture and the milk into the creamed mixture in alternating additions, starting and ending with the flour mixture and mix until just combined.
  10. Stir in 1 cup of the toasted pecans.
  11. Divide the batter between the 2 pans and bake for 30-35 minutes, or until a toothpick inserted into the center comes out clean. Watch the cake carefully at the end of the baking time as it can over bake and dry out quickly.
  12. Cool on wire racks for about 10-15 minutes.
  13. Run a knife around the edge of the cake pans and turn the cakes out on the wire racks to cool completely.
  14. For the Brown Sugar and Cinnamon Swiss Meringue Buttercream:
  15. In a large bowl (I used the bowl of my stand mixer), combine the egg whites, brown sugar, and salt.
  16. Place the bowl over a pot of simmering water and whisk often. The water should not touch the bowl, since it's the steam that will be heating the egg whites. If they heat up too fast, you'll end up with scrambled eggs.
  17. Using a candy thermometer, heat the mixture to 160 degrees fahrenheit while continuing to whisk the mixture. 160 degrees is for food safety issues. If you use pasteurized egg whites, you can stop heating around 120-140 degrees until the sugar has dissolved.
  18. Remove the egg whites from the heat and use a whisk attachment to beat the egg whites on medium high until stiff peaks form and the meringue has doubled in volume (about 8-10 minutes). At this point, the meringue should look stiff and glossy, and the bowl should be neutral (not warm) to the touch. If your meringue is still warm, you'll run into problems later.
  19. Turn the mixer down to low and mix in the cubes of softened butter, one at a time until they become incorporated into the mixture.
  20. It may look curdled at first, but continue mixing until the frosting has become smooth.
  21. Add the vanilla extract and cinnamon and beat to combine.
  22. To Assemble the Cake:
  23. Split the cake layer in half horizontal with the knife to divide them.
  24. Place one layer of the cake on an 8-inch cake board.
  25. With an offset spatula, spread about 1 cup of the frosting on top of the first layer, followed by about 1/3 cup of the caramel sauce (If the caramel difficult to spread, warm it up slightly in the microwave and use a piping bag to drizzle it on the buttercream).
  26. Repeat this process with the second and third layer, spreading another 1 cup of the frosting and 1/3 cup of caramel on top of each.
  27. Place the 4th layer of cake on top.
  28. Place the cake on a turntable, and apply a thin layer of the frosting on the sides and the top of the cake to lock in the crumbs.
  29. Let the frosting set up in the refrigerator for about 30 minutes.
  30. Apply the remainder of the frosting to the sides and top of the cake, using an offset spatula and a bench scraper to smooth out the sides.
  31. Put the cake in the fridge for another 1/2 hour-1 hour to let the frosting set. (This will keep the frosting from melting when you add the caramel sauce and help control the "drippiness" of the caramel).
  32. If the caramel sauce has gotten too thick, microwave it 10 second intervals until it is slightly runny but not hot.
  33. Pour small amounts of caramel sauce over the top of the cake until is starts to gently run down the sides.
  34. Smooth the top of the cake out with an offset spatula if necessary.
  35. Top with the remaining toasted pecans and serve at room temperature.
3.1
https://cakemerchant.com/2014/10/16/cinnamon-caramel-pecan-cake/

Notes:
Cake recipe adapted from Taste of Home.
You can halve this recipe to make a 4 layer 5-inch cake (like the one you see pictured here). Reduce the baking time by about 5 minutes.

39 Comments · Cake, Holiday

No Bake Tiger Butter Tart

10.08.14

Tiger Butter Tart

Have you heard of tiger butter? It’s basically just white chocolate, peanut butter, and dark chocolate all swirled together to look like tiger stripes. I was first introduced to tiger butter on my 7th birthday, so it’s kind of a nostalgic flavor for me. I had a candy making party at the shop where my mom took cake decorating classes, and even though we made lots of different candies that day, I can’t remember any other than the tiger butter. Maybe there’s something about the chocolate peanut butter combo that just sticks with you. Or perhaps it’s because I was in a sugar coma from all of the candy I ate, so I don’t remember much else. I do remember my friends and I eating the hell out of some tiger butter, though. My poor mother…

I didn’t think about tiger butter for a long time after that, but when I moved to LA, they had tiger butter caramel apples at a candy shop near Hollywood and Highland. Every time a friend or family member would come to town, we’d do the usual touristy stuff and as a reward for seeing the walk of fame for a gazillionth time, I would treat myself to a tiger butter apple.

Since it’s almost Halloween, I had planned to make tiger butter caramel apples in the spirit of the holiday. I soon realized that these apples required more coordination than I had, so I ended up making this tiger butter tart instead, and I think it tastes even better than the apple version. I suppose it’s no longer a Halloween themed treat, but it does taste like candy. Plus, it’s way easier to make. The swirl pattern is simpler than it looks.

You’ll start by pouring in your peanut butter ganache filling into the prepared tart shell. Then take your chocolate ganache and put it into a piping bag or a plastic bag (make sure it’s slightly cooled so you don’t melt the bag) and creating a zig zag pattern over the peanut butter mixture. As you can see, it doesn’t have to be precise. Next, take a wooden skewer and stick it about halfway down into the filling (don’t let it touch the crust) and make a figure 8 pattern all throughout mixture. Again, doesn’t need to be precise. It will still come out looking pretty.

Tiger Butter Tart

The first time I made this, I used whole Oreo cookies for the crust, but combination of whole Oreos with a sweet tart filling was tooth achingly sweet. I ended up using a mixture of Newman’s Own alphabet cookies and chocolate graham crackers just because it’s what I had on hand. You could also use the outsides of Oreo cookies minus the cream or those elusive chocolate wafer cookies (which I finally found but were quite expensive). I ended up using a stick of melted butter in the crust, but you may need more or less depending on what kind of cookie you use. Just make sure the texture is not too crumbly or you won’t be able to mold it into the tart pan. A chocolate shortbread crust would work nicely too. Maybe I’ll try that next time when I’m not too lazy to roll out dough.

I hate to dirty extra dishes so the first time I made the filling, I dumped the white chocolate into the pot of hot cream and whisked the heck out of it to make it smooth keep it from sticking to the bottom of the pot. However, you’ll end up with grainy ganache if you do this. Put the white chocolate in a separate bowl, pour the cream over it, and let it melt slowly. It’s worth the extra dirty dish.

Tiger Butter Tart
Tiger Butter Tart

Print
No Bake Tiger Butter Tart

Yield: One 14x5 Tart

Ingredients

    For the Crust:
  • 10 ounces chocolate wafer cookies
  • 8 tablespoons (113 grams) unsalted butter, melted
  • For the Chocolate Ganache:
  • 1/3 cup semisweet or bittersweet chocolate (or chocolate chips)
  • 3 tablespoons heavy cream
  • Plastic bag
  • Wooden skewer
  • For the Peanut Butter Filling:
  • 8 ounces (227 grams) good quality white chocolate, chopped (not candy melts)
  • 1/2 cup (120 ml) heavy cream
  • 1/2 cup peanut butter

Instructions

    For the Crust:
  1. Put the chocolate wafer cookies in a food processor and process until they are finely ground.
  2. Add the melted butter and mix until the cookie crumbs are well coated.
  3. Press the crust into a 14x5 inch tart pan (I used this one) and refrigerate while you make the filling.
  4. For the Chocolate Ganache:
  5. Place the chopped chocolate in a heatproof bowl.
  6. Heat the heavy cream in a small saucepan until just boiling.
  7. Pour the heavy cream over the chocolate and let sit for about 5 minutes.
  8. Whisk gently until smooth and set aside to cool slightly.
  9. For the Peanut Butter Filling:
  10. Place the chopped white chocolate in a heat proof bowl.
  11. In a small saucepan, heat the heavy cream until it's just about to boil.
  12. Pour the heavy cream over the white chocolate and let it sit for about 5 minutes.
  13. Whisk the ganache gently until smooth.
  14. Add the peanut butter a few tablespoons at a time and whack gently after each addition until the mixture is smooth.
  15. Pour the peanut butter mixture into the prepared tart crust.
  16. To Make the Swirl
  17. Once the chocolate has cooled slightly, put it into a piping bag or a ziploc bag.
  18. Snip the corner off the end of the bag and pipe onto the peanut butter filling in a zig zag pattern.
  19. Put a wooden skewer halfway dow into the mixture being careful not to touch the bottom and swirl it around in a figure 8 motion.
  20. Refrigerate the tart for about an hour, or until set.
3.1
https://cakemerchant.com/2014/10/08/tiger-butter-tart/

17 Comments · Candy, Pie

  • Newer Posts
  • 1
  • …
  • 17
  • 18
  • 19
  • 20
  • 21
  • …
  • 51
  • Older Posts

About Me

Welcome to the Cake Merchant! I’m Natasha, the cake maker behind this blog. Here, I share my favorite cakes, baking tips, dessert experiments, and the occasional picture of my dog... READ MORE

Keep In Touch

  • Email
  • Instagram
  • Pinterest
  • RSS

Subscribe

Small Batch Favorites

  • Vegan Blueberry Almond Crumb Muffins for Two
    Vegan Blueberry Almond Crumb Muffins for Two
  • Teeny Tiny Chocolate Cake for One
  • Double Chocolate Chip Skillet Cookie for Two
  • Mini One Bowl Yellow Cake with Malted Chocolate Frosting
  • Birthday Cakes in a Jar
  • Small Batch Chocolate Chip Cookies

© Copyright 2025. The Cake Merchant. All Rights Reserved. Design by Oh Wild.

Cleantalk Pixel